
[Part 2] REST API Components & How to read them
[Part 2] REST API Components & How to read them
Decode the language of the web by breaking down REST APIs into their core components. Learn how to read requests, interpret status codes, and understand exactly what's happening between the client and the server.

" height="20px" id="D2av7Oa6w" width="20px"/></svg>)
" height="20.035778175313055px" id="eWFuVHpu9" width="22.150617531305898px"/></svg>)
" height="20.19299259259259px" id="jW1ICukqX" transform="translate(0 0)" width="20.05540740740753px"/><path d="M 5.014 19.008 C 7.783 19.008 10.028 14.753 10.028 9.504 C 10.028 4.256 7.783 0 5.014 0 C 2.245 0 0 4.256 0 9.504 C 0 14.752 2.245 19.008 5.014 19.008 Z" fill="rgb(0, 0, 0)" height="19.00823703703702px" id="o80dVBhnW" transform="translate(21.028 0.592)" width="10.02800000000002px"/><path d="M 1.764 17.031 C 2.738 17.031 3.527 13.218 3.527 8.515 C 3.527 3.813 2.739 0 1.764 0 C 0.79 0 0 3.814 0 8.515 C 0 13.217 0.79 17.031 1.764 17.031 Z" fill="rgb(0, 0, 0)" height="17.030755555555572px" id="dzJnzwG1A" transform="translate(32.028 1.58)" width="3.527407407407395px"/></g></svg>)
Dev teams spend a large chunk of time designing and building APIs so it’s crucial you’re able to fully engage during technical discussions about them.
In this 3-part “Guide to APIs” series, I’ll walk you through the most critical API knowledge. We won’t go deep into implementation—just deep enough for you to be dangerous.
[Part 2] REST API components & How to read them
————————————————————
If you missed Part 1 of this 3 part "Guide to APIs" series, check it out here.
In Part 1, you learned about API communication protocols and 3 of the most commonly used ones: REST, SOAP, and GraphQL.
In Part 2, we’re going to get real close and intimate with REST APIs specifically.
Why? Because REST APIs are the most prevalent and user-friendly type of APIs that you’re most likely encounter. As a product manager, you play a pivotal role in working with your engineering team to bring digital solutions to life, and a fundamental part of that collaboration is understanding REST APIs.
So in this essay, you’ll get a break down of REST APIs into their essential components so you can confidently discuss, dissect, interact with, and debug them.
Brief intro to REST APIs
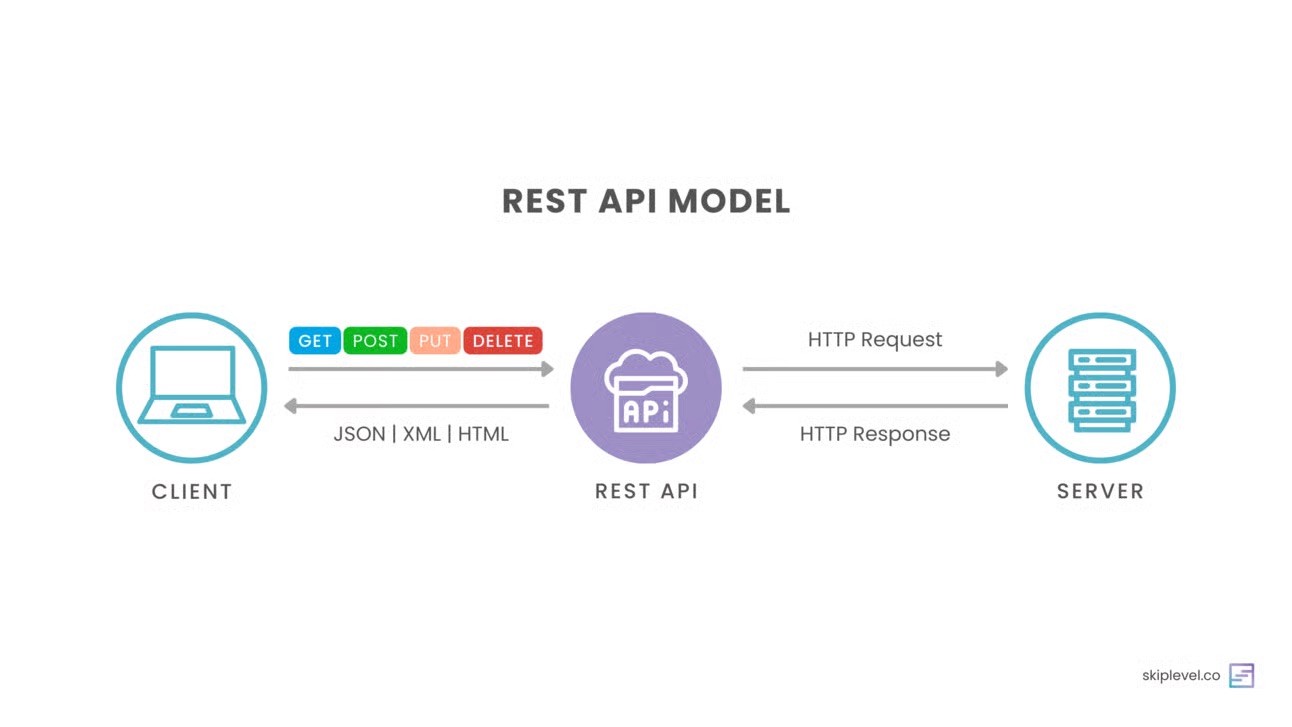
Recall in part 1 that APIs allow two applications to communicate with each other.
REST APIs are a set of rules and conventions that defines a standardized way for requests and responses to be structured and exchanged. It is based on the principles of REST, which is a software architectural style for designing networked applications. You’ll also hear the term RESTful APIs in relation to REST APIs.
Here are a couple examples of RESTful rules and conventions followed by REST APIs (not important to memorize, just to give you an idea of what these rules look like):
Client-server: Separation of concerns whereby the user interface concerns (client) are separate from the data storage concerns (server).
Stateless: Each request from the client to the server must contain all of the information necessary to understand and complete the request. The server cannot use previously stored context information on the server.
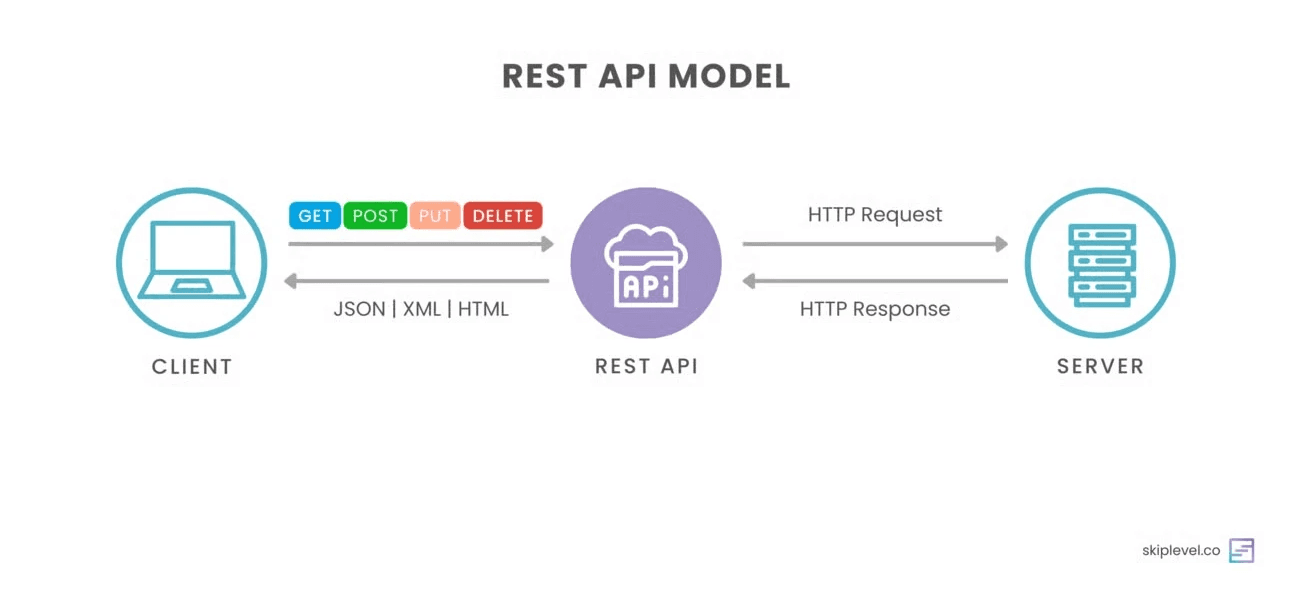
REST APIs make extensive use of HTTP (Hypertext Transfer Protocol) as the foundation for communication between clients (like web browsers or mobile apps) and servers (where the API is hosted).

A PDF Guide to APIs, Designed for PMs
Get a clear understanding of what APIs are and why they matter for maximizing product success.
The majority of what you need to know about APIs are related to HTTP and it’s components. We can broadly bucket the components into the API Request and API Response:
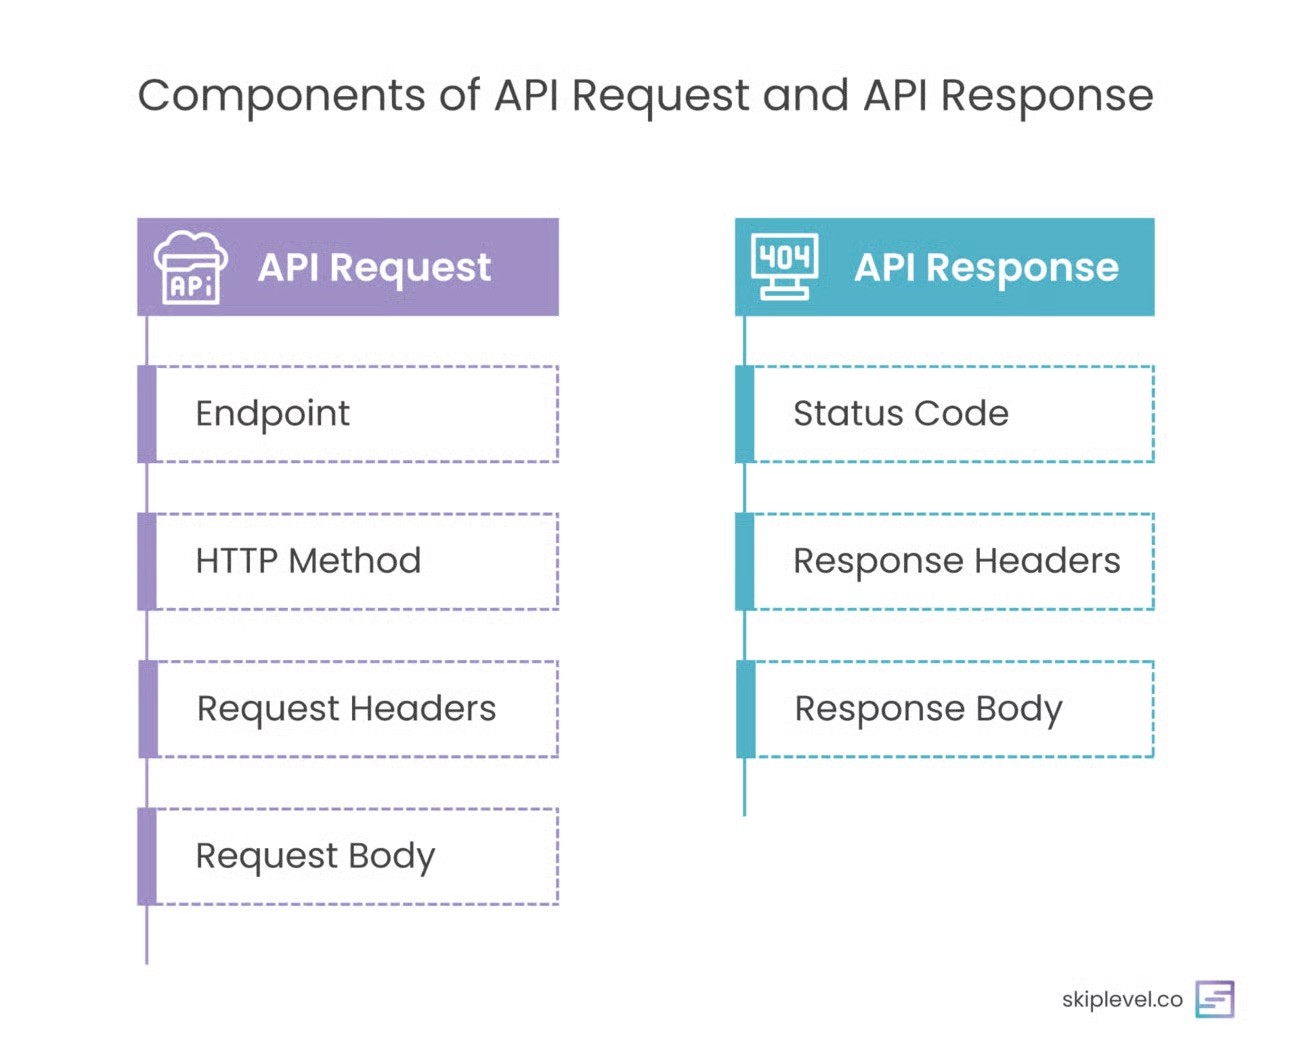
API Request
When you make a request to an API, you’re essentially saying, “I want to do something or get something from this endpoint.” Requests consist of the following components:
Endpoint
HTTP Method
Request Headers
Request body
1/ API Endpoint
An endpoint is the specific location aka the access point to the API. Think of it as an address for a particular service or resource. These endpoints are usually represented as URLs (Uniform Resource Locators), making them easy to understand. The API endpoint is made up of the “ Base URL” plus the “path” of the API.

2/ HTTP Methods
HTTP (Hypertext Transfer Protocol) methods are the actions you can take when interacting with an API. There are 8 request types but 4 are the most commonly used:
GET: This method is like asking for information. When you send a GET request to an API’s endpoint, you’re requesting data, like retrieving weather information for a specific location.
POST: When you send a POST request, you’re submitting data to the API which adds new data to the database. This could be creating a new user account or adding a comment on a blog post.
PUT: Use the PUT method to update existing data. For instance, you might change your profile picture on a social media app.
DELETE: As the name suggests, the DELETE method is for removing data. If you want to delete a post or an account, you’d use this method.
You’ll likely see all 4 HTTP methods being used at some point, but out of the 4, you’ll see the GET and POST method most frequently and those are the two that you should be most familiar with.
Two quick side notes:
The POST and PUT methods are often used interchangeably. The difference has to do with something called idempotency which is very technical in nature and really not worth diving into if you’re just getting started with APIs, but feel free to read about idempotency here if you’re curious.
You’ll also see the same POST API sometimes used to both add new data and update existing data. Developers may decide to design the API this way to be more efficient as opposed to creating and managing two separate APIs in the business logic: one POST and the other PUT.
3/ Request Headers
Request headers convey additional information about the API request, such as the format in which the client expects the response (e.g., JSON or XML), authentication credentials, caching instructions, and more.
Here’s an example using Amazon:

Information in the request header can be used for a number of reasons including:
Authenticating the request: There are various authentication methods, such as API keys, OAuth tokens, and username/password combinations. For example, credentials for your bank account so the API is authorized to make changes to your account.
Caching instructions: Temporarily storing data in a cache for improved future performance/latency.
Logging: All systemskeep a log of events that occur in a computer system. Information stored in the headers (i.e. location of request origin, browser information, date & time of request, etc..) are logged in log files. The information in the log files can then be used for a variety of reasons: debugging, metrics, and telemetry.Accept-Language: en-USAuthorization: Bearer YourAccessTokenHere
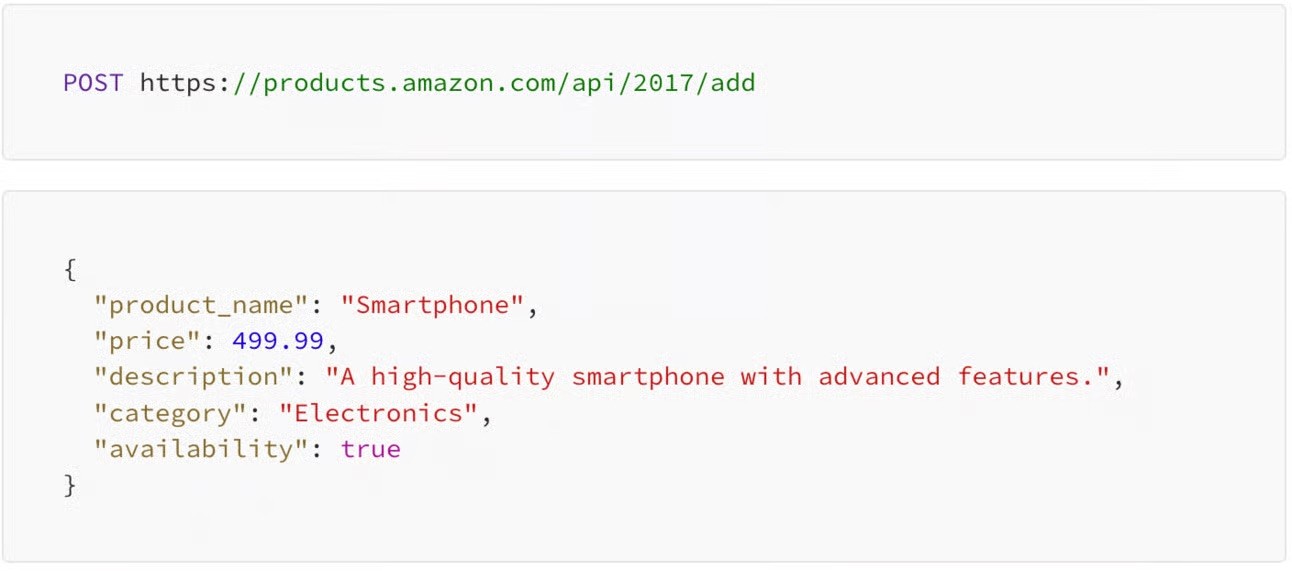
4/ Request Body
When you need to send data to the server, you include it in the request body. The data is typically in a structured format like JSON or XML. This is common when creating new records or updating existing ones. The request body is akin to a letter with the information you want to submit.
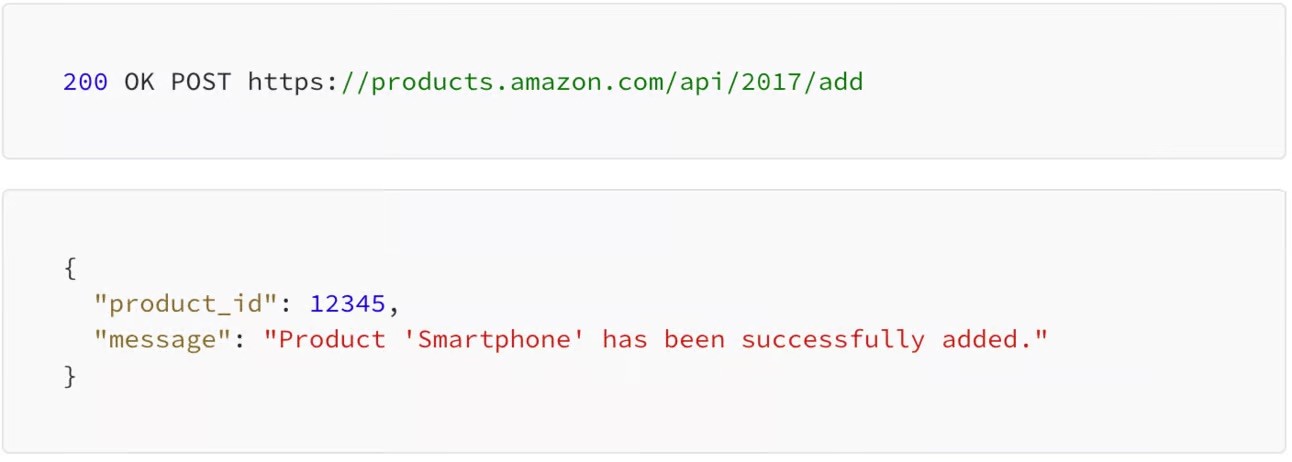
For example: Amazon has an internal API that adds a new product into the database.
API Response
Once you send a API request, you’ll receive an API response. This response contains the data or information you requested, as well as metadata about the response itself. It consists of the following components:
Status Code
Response Headers
Response Body
1/ Status Code
This is a three-digit number that tells you the outcome of your request. Status codes are like short, standardized messages that quickly convey whether your request was successful, encountered an issue, or faced an error. All status codes are divided into 5 categories but you’ll only really encounter 4 of them:
2xx: Success — The API request was successful! e.g. 200 OK, 201 Created
3xx: Redirection — The API request has more than one response. e.g. 301 Moved Permanently, 302 Found
4xx: Client Error — Some information provided in the request was wrong or missing. e.g. 400 Bad Request, 401 Unauthorized
5xx: Server Error — Something went wrong on the server and the request wasn’t successful. e.g. 501 Internal Server Error, 502 Bad Gateway
Here are some examples of common status codes:
200 OK: Your request was successful, and you’ll find the data you wanted in the response.
201 Created: This code typically appears after a successful POST request, indicating that the resource you requested has been created.
400 Bad Request: If the API couldn’t understand your request, you might see this code.
401 Unauthorized: When you lack proper authorization or credentials to access the requested data, this code appears.
404 Not Found: This indicates that the endpoint or resource you’re looking for doesn’t exist.
500 Internal Server Error: If something goes wrong on the other island (the API’s server), you might see this code.

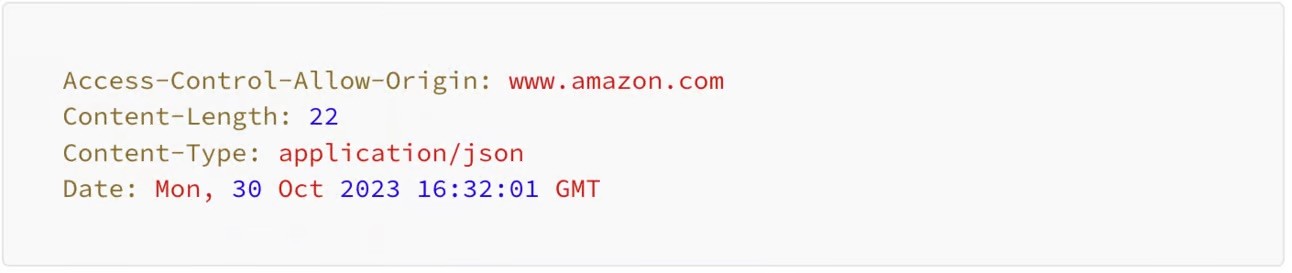
2/ Response Headers
Similar to request headers, response headers provide additional information about the response, such as the type of data you’re receiving (e.g., JSON or XML), the server’s version, and more.
Here’s an example also using Amazon:
3/ Response Body
This is where you’ll find the actual data or information you requested. Like the request body, the response body is often in JSON format for easy readability and parsing.
Using the same Amazon API example as the one in the request body, here’s what a successful response where the product was successfully added to the database might look like. Notice the API response returned a newly created product_id uniquely assigned to the added product.
Conclusion
We’ve covered the crucial parts of the API and you now have all the information you need to confidently discuss, dissect, interact with, and debug APIs.
In Part 3 of this API guide, we’re going to apply your new found knowledge into practical use. We’re going to look at a couple of real-life scenarios where you’ll need to apply your API knowledge as a product manager and you’ll learn how to debug errors based on API responses.
[Part 2] REST API Components & How to read them